NisusAI UiPath Integration Guide
Enhance your UiPath RPA workflows with NisusAI's generative ai capabilities and Build Agentic AI Processes
Integration Steps
RPA NuGet Package Setup
Easily install the NisusAI NuGet package via Project Manager.
- Open 'Manage NuGet Packages' in the Package Manager
- Search for and install the NisusAI package
- Necessary dependencies are resolved automatically
Agentic AI Activity Configuration
Integrate NisusAI activities into your RPA workflows.
- Set the required parameters in activity properties
- Build your Agentic AI RPA architecture
- Define input and output parameters
Review Sample Agentic AI Usage
Quick integration with AI Assistant examples
- Use pre-configured activity templates
- Review sample scenarios and adapt them to your workflow
- Enhance your Agentic AI process
UiPath Agentic AI Example
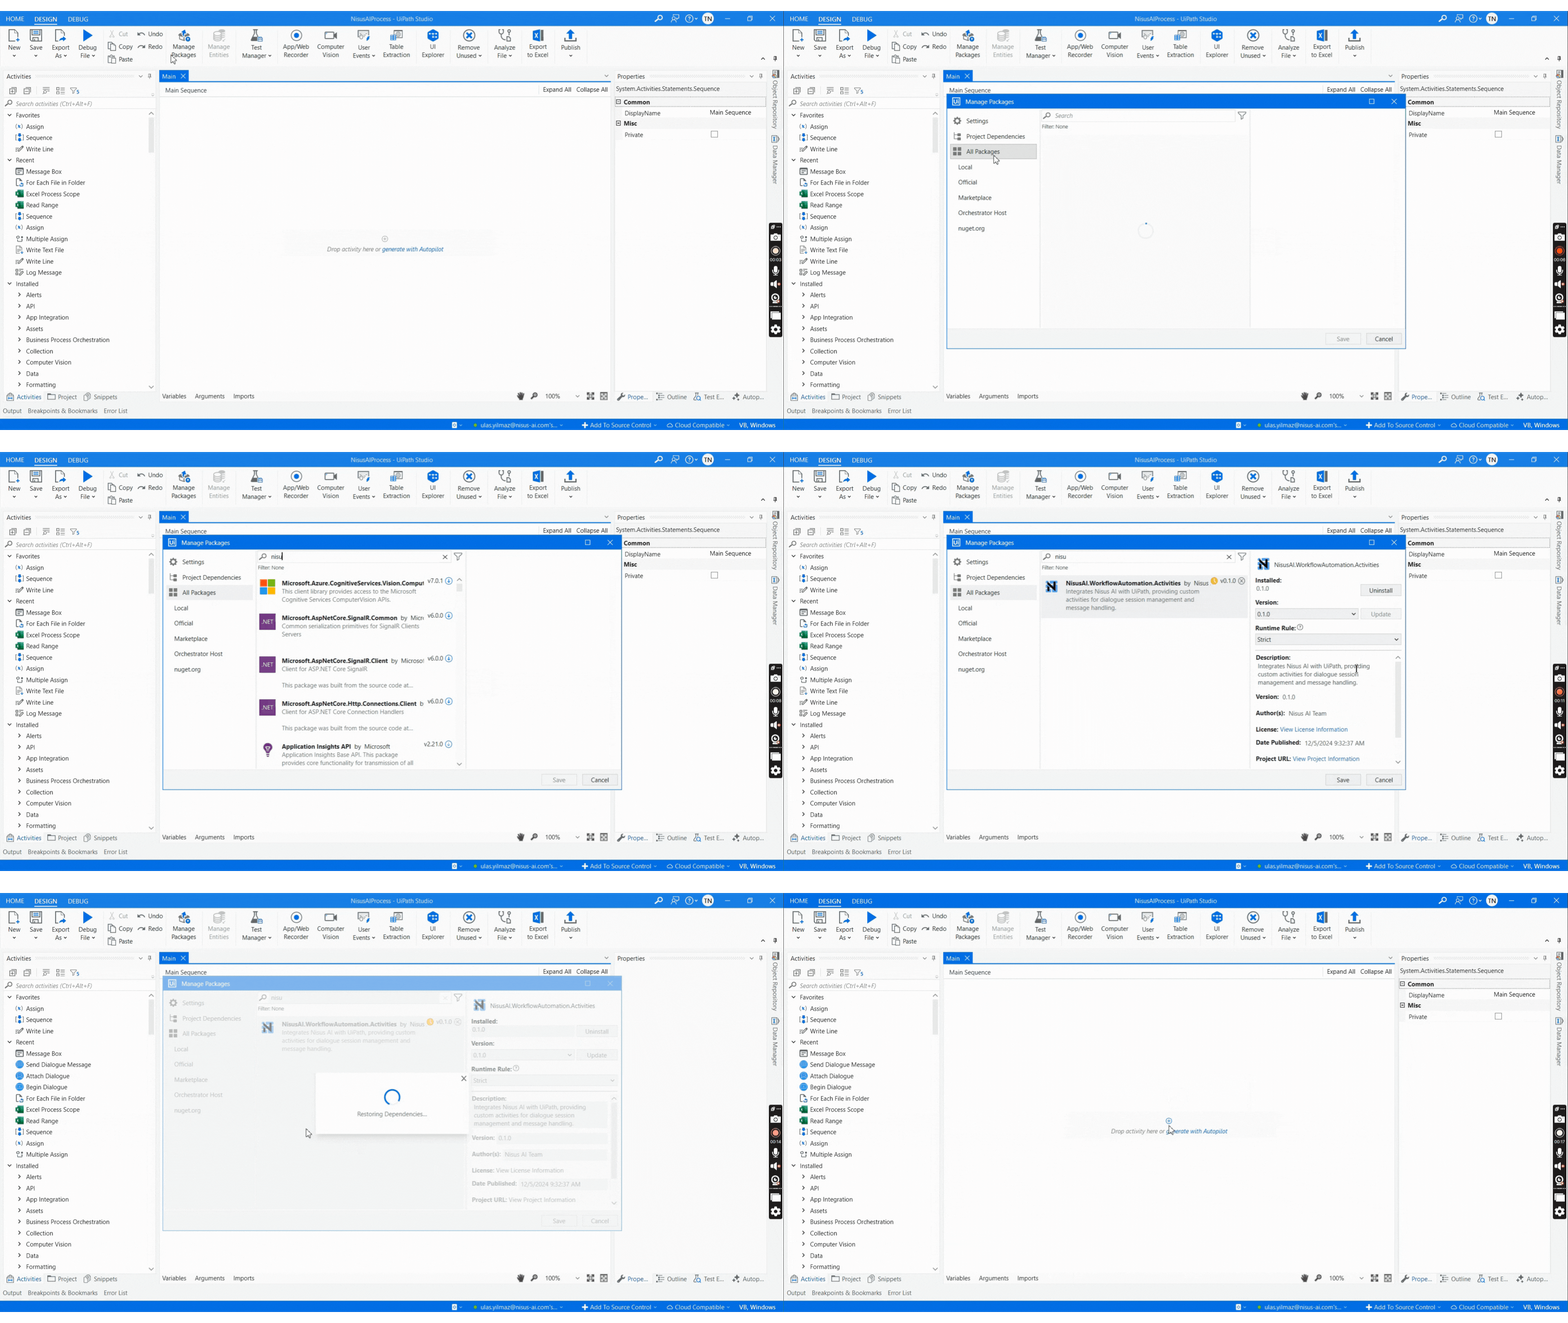
Step 1: Add NuGet Package
Open UiPath Studio and go to the project menu. Click on 'Manage Packages'. From the top menu, select 'All Packages'. Type 'Nisus' in the search bar and press Enter. Find the NisusAI NuGet package from the list, click 'Install', and complete the installation.
Step 2: Add Begin Dialogue Activity
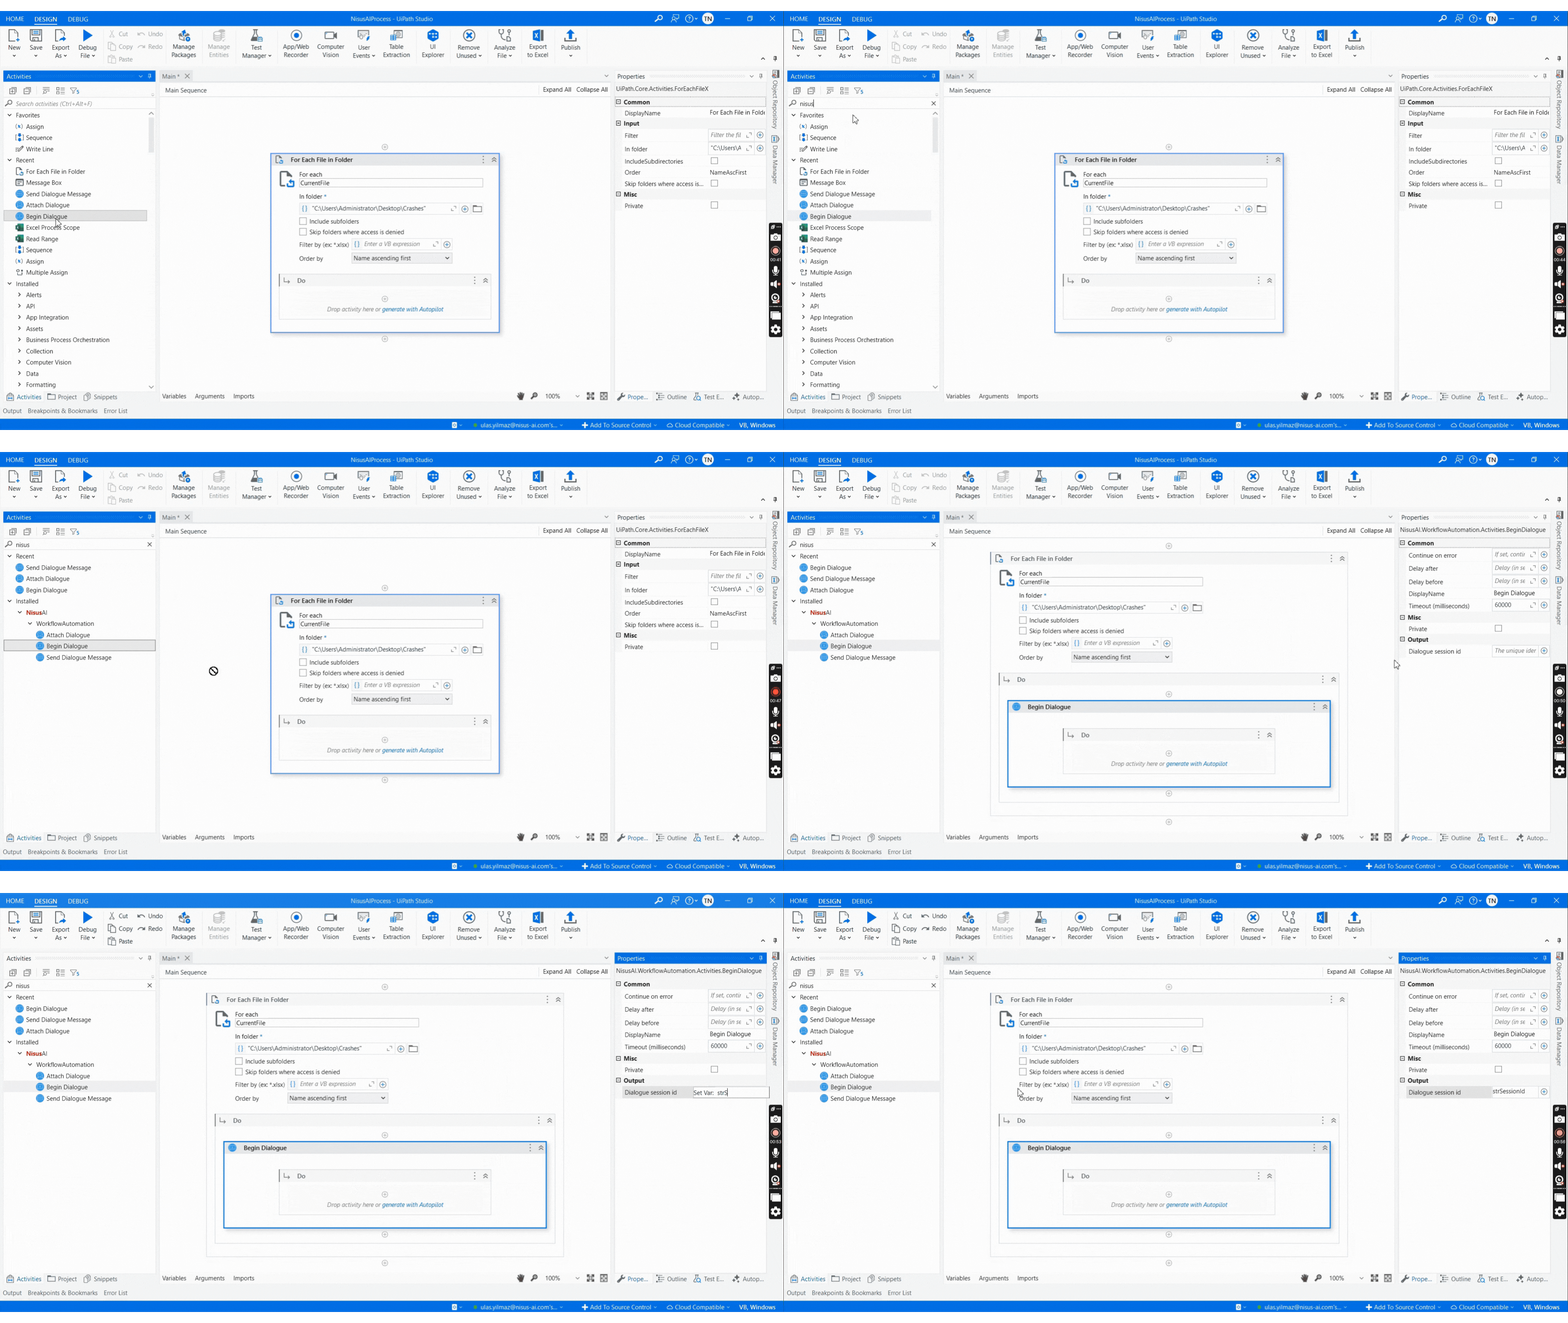
Find the 'Begin Dialogue' activity from the project panel and drag it into your workflow. When executed, this activity generates a Session ID. Save the generated Session ID in a variable named 'strDialogueId'. This will be used in the next steps.
Step 3: Use Attach Dialogue Activity
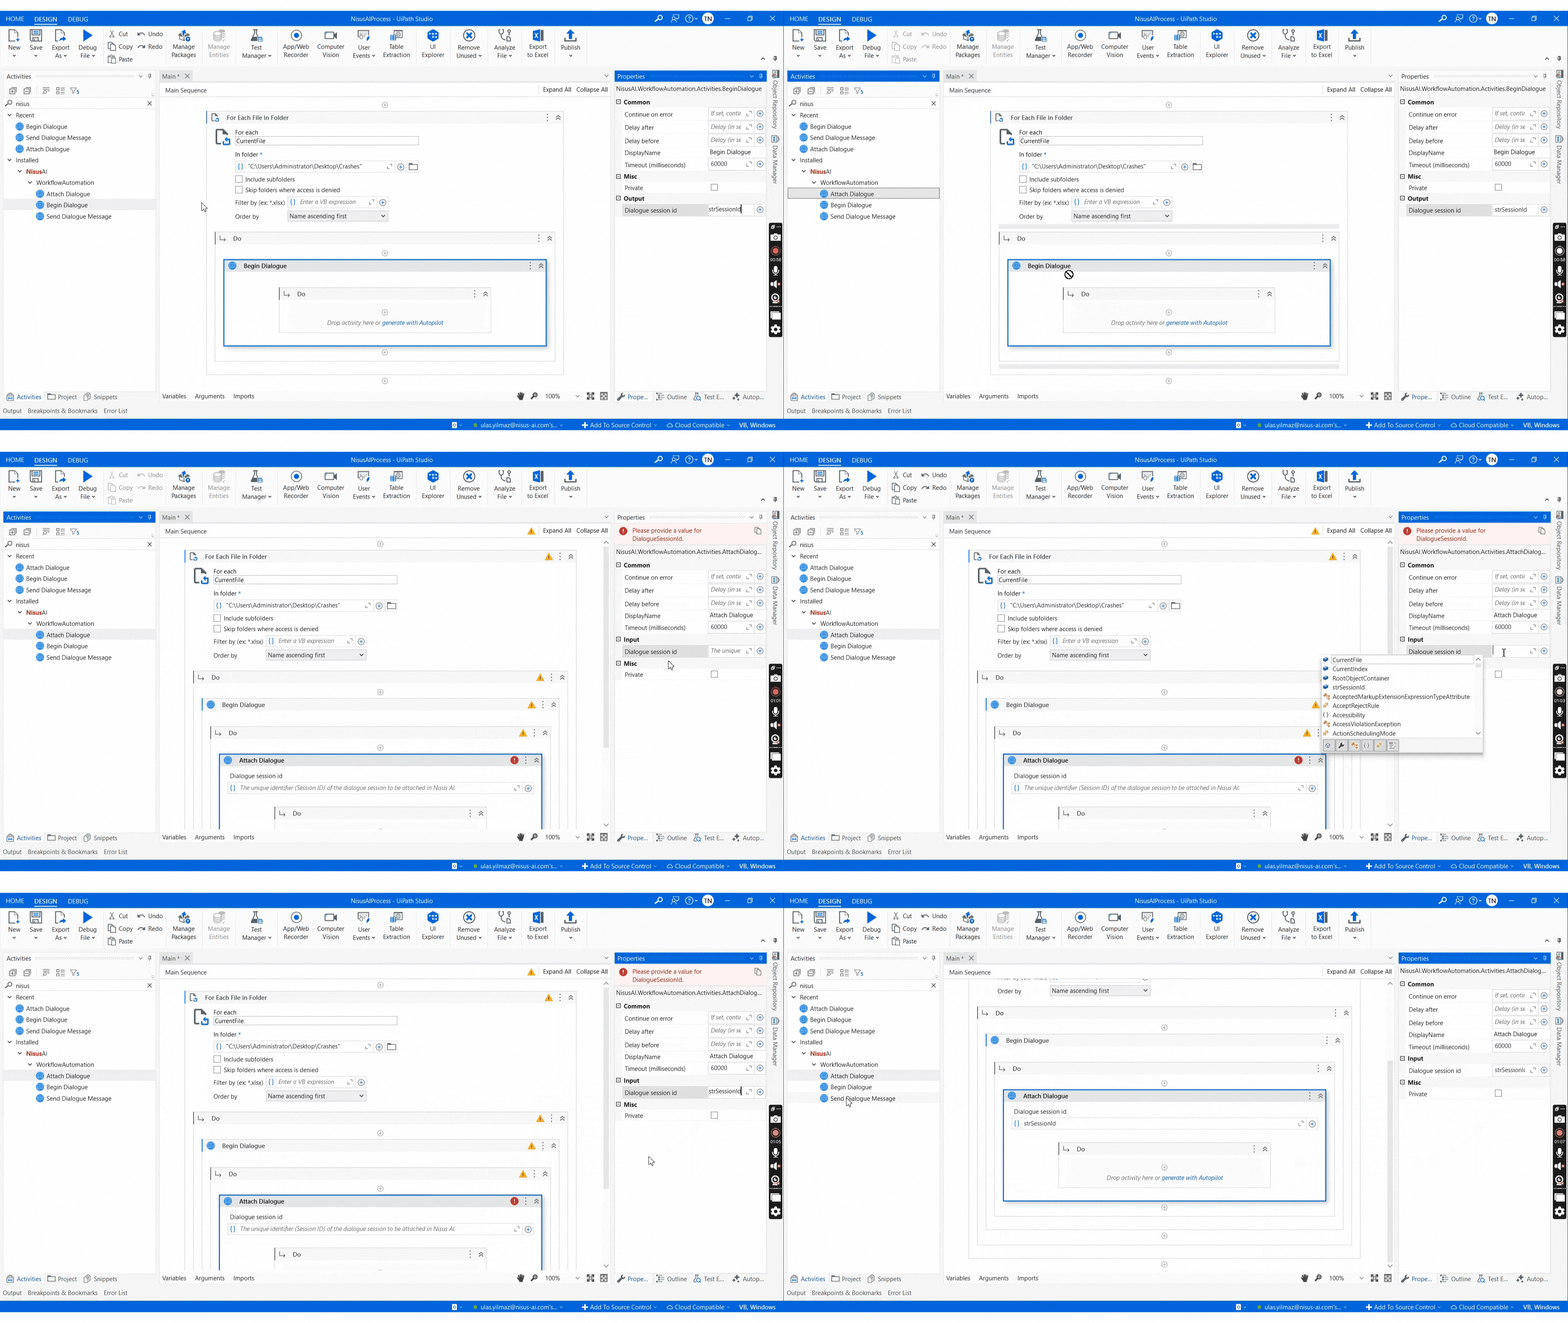
Find the 'Attach Dialogue' activity in the project panel and add it to your workflow. Provide the 'strDialogueId' variable as input in the 'Session ID' field. This activity connects to the session initiated by Begin Dialogue, ensuring messages are processed under the same session.
Step 4: Send Dialogue Activity and Send a Message
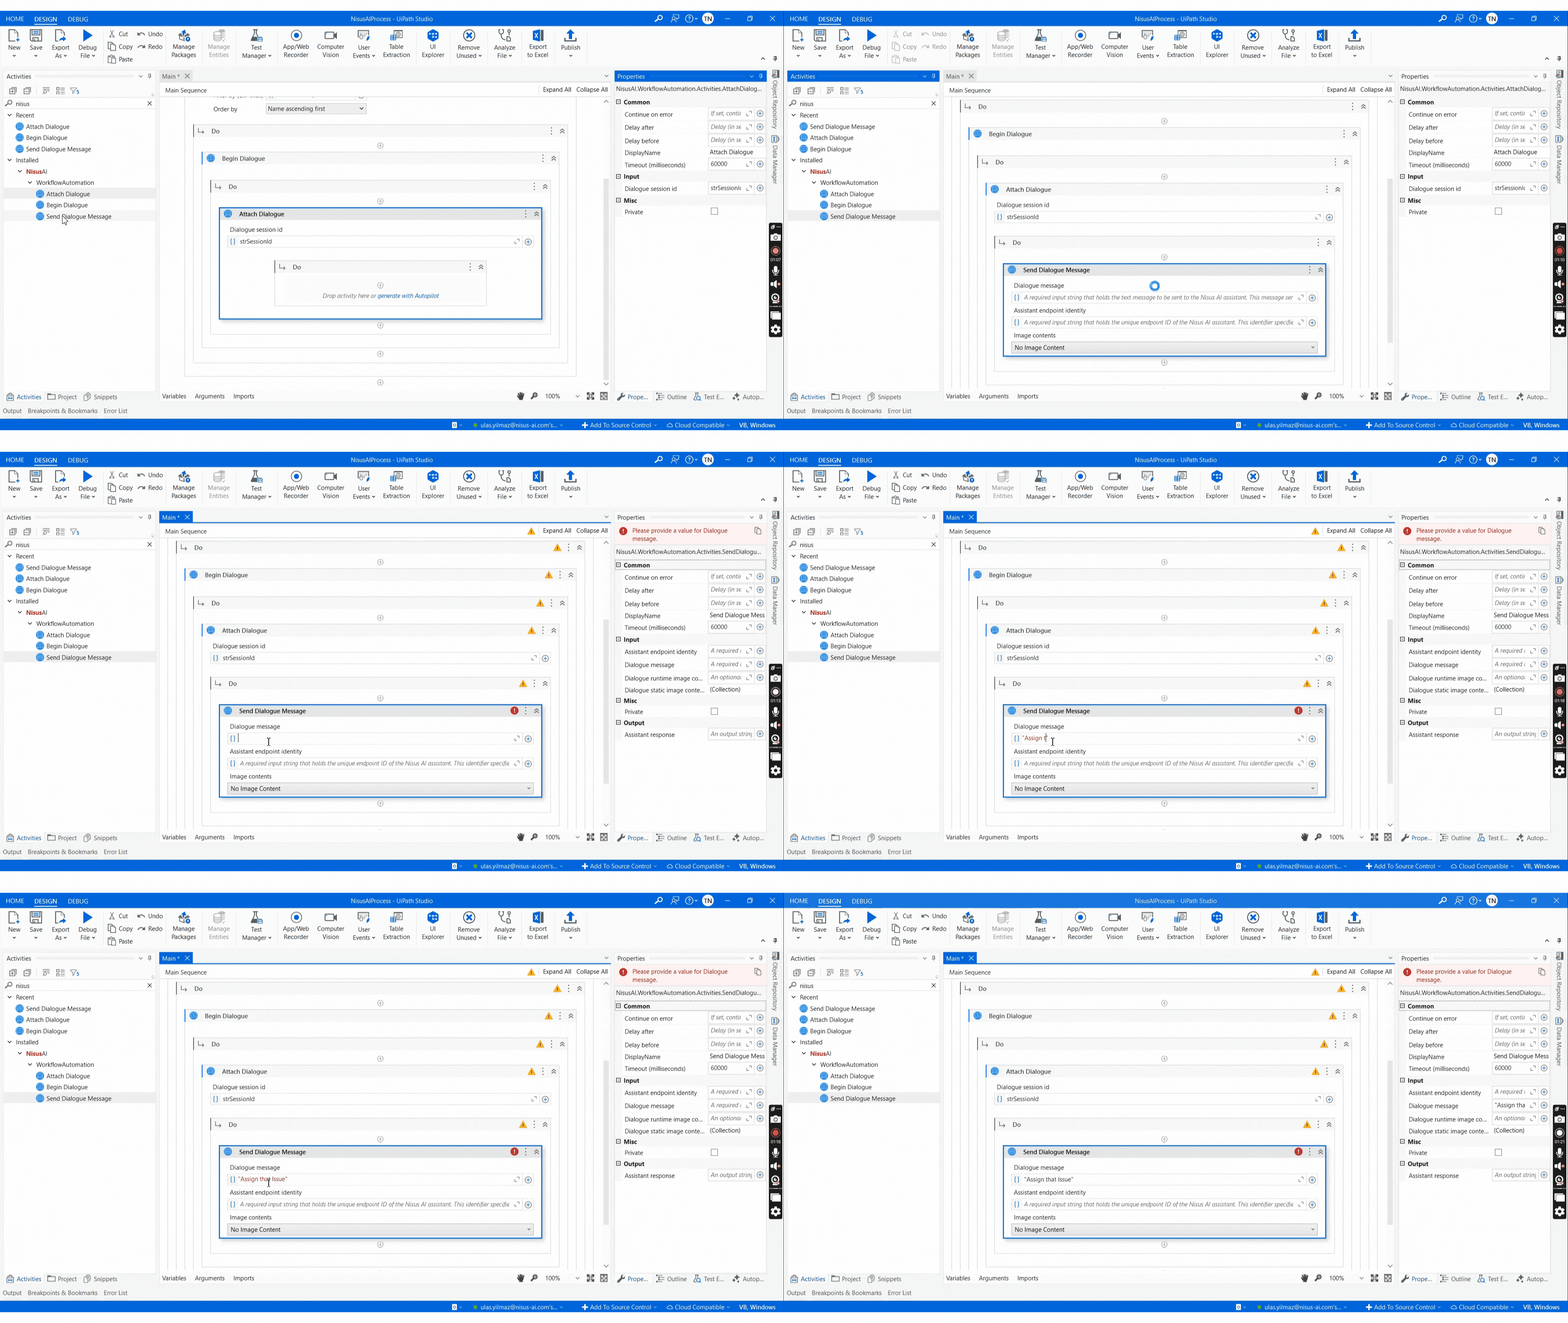
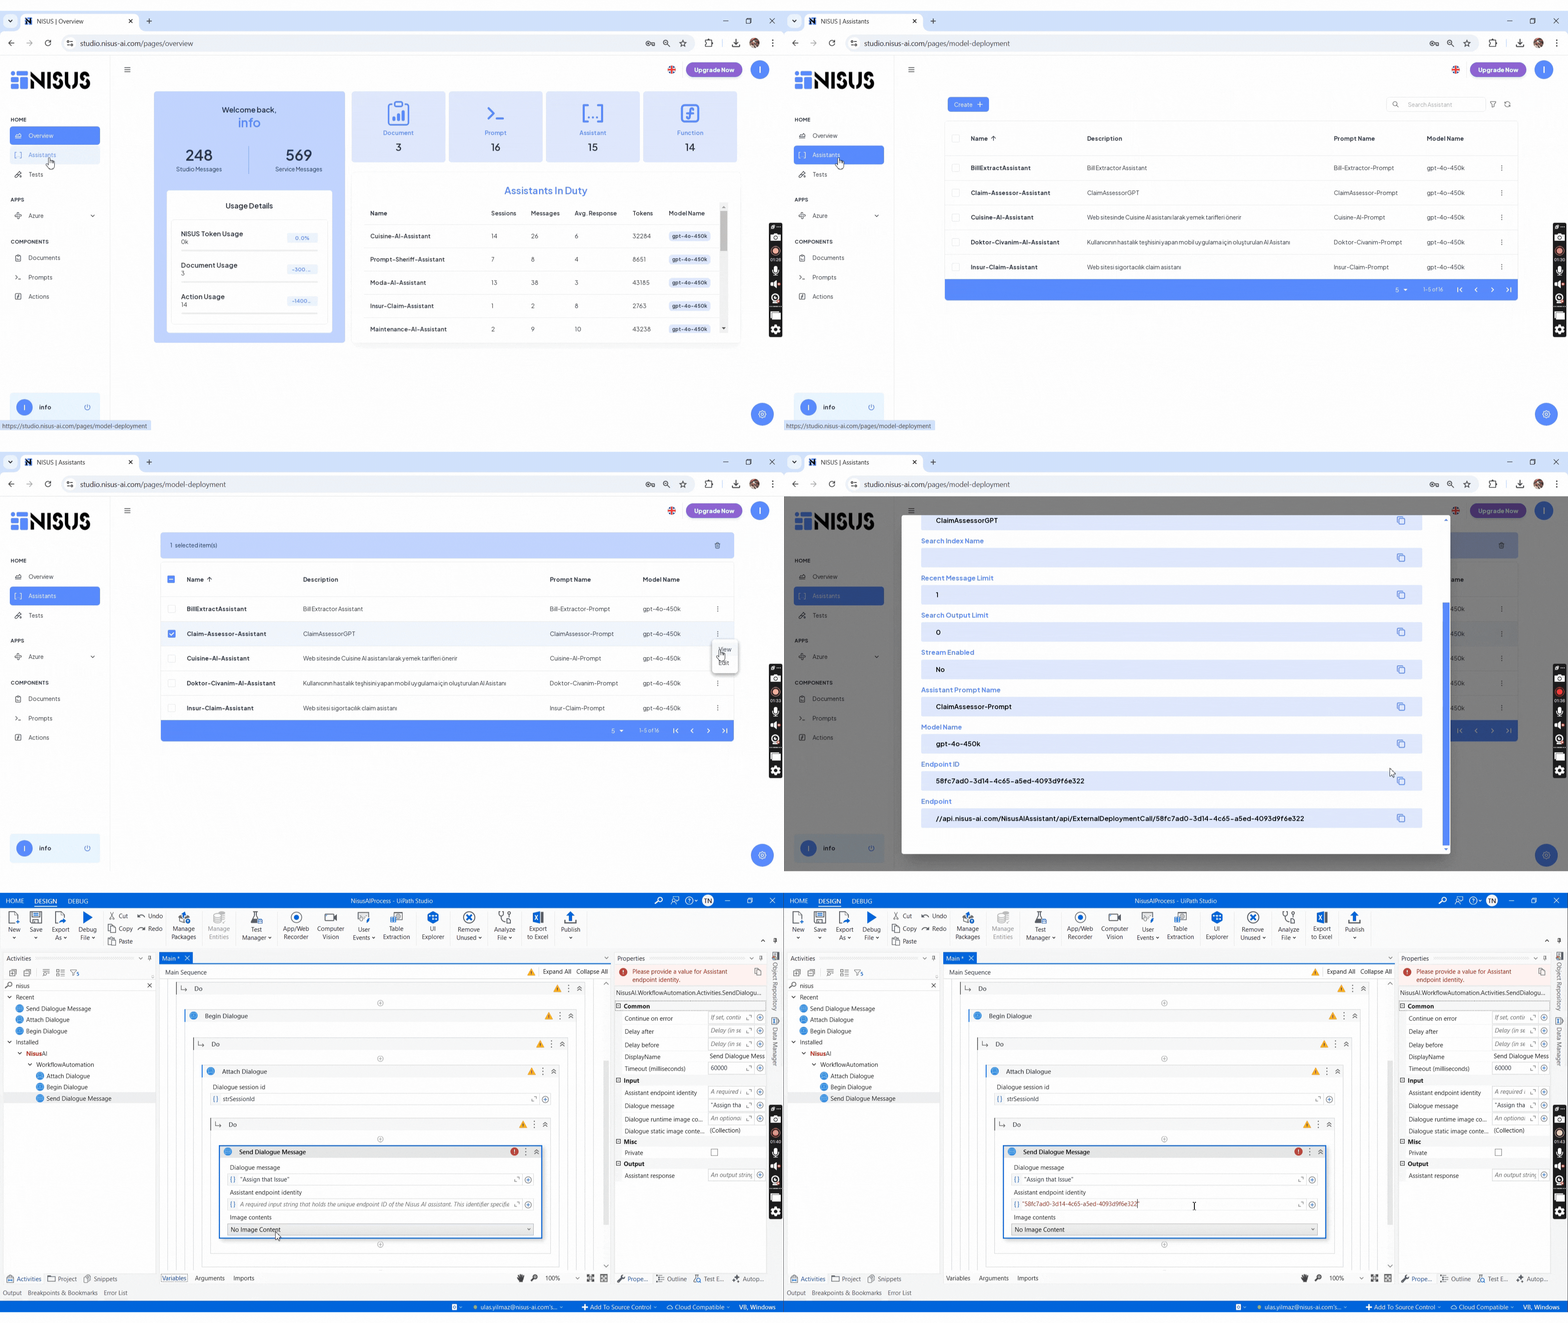
Locate the 'Send Dialogue Message' activity and add it to your workflow. Enter the AI assistant's Endpoint ID in the 'Assistant Endpoint ID' field. If sending a text query, type the message in the 'Message' field. When executed, this activity sends the message and retrieves a response.
Step 5: Retrieve EndpointId from NisusAI Interface
Log in to the NisusAI platform. Find the assistant you created in the list of AI assistants. Click the three dots on the right and select 'View'. Copy the EndpointId value from the opened window. Paste this value into the 'Assistant Endpoint ID' field in the Send Dialogue activity.
Step 6: Define Dynamic Visual and Document Paths
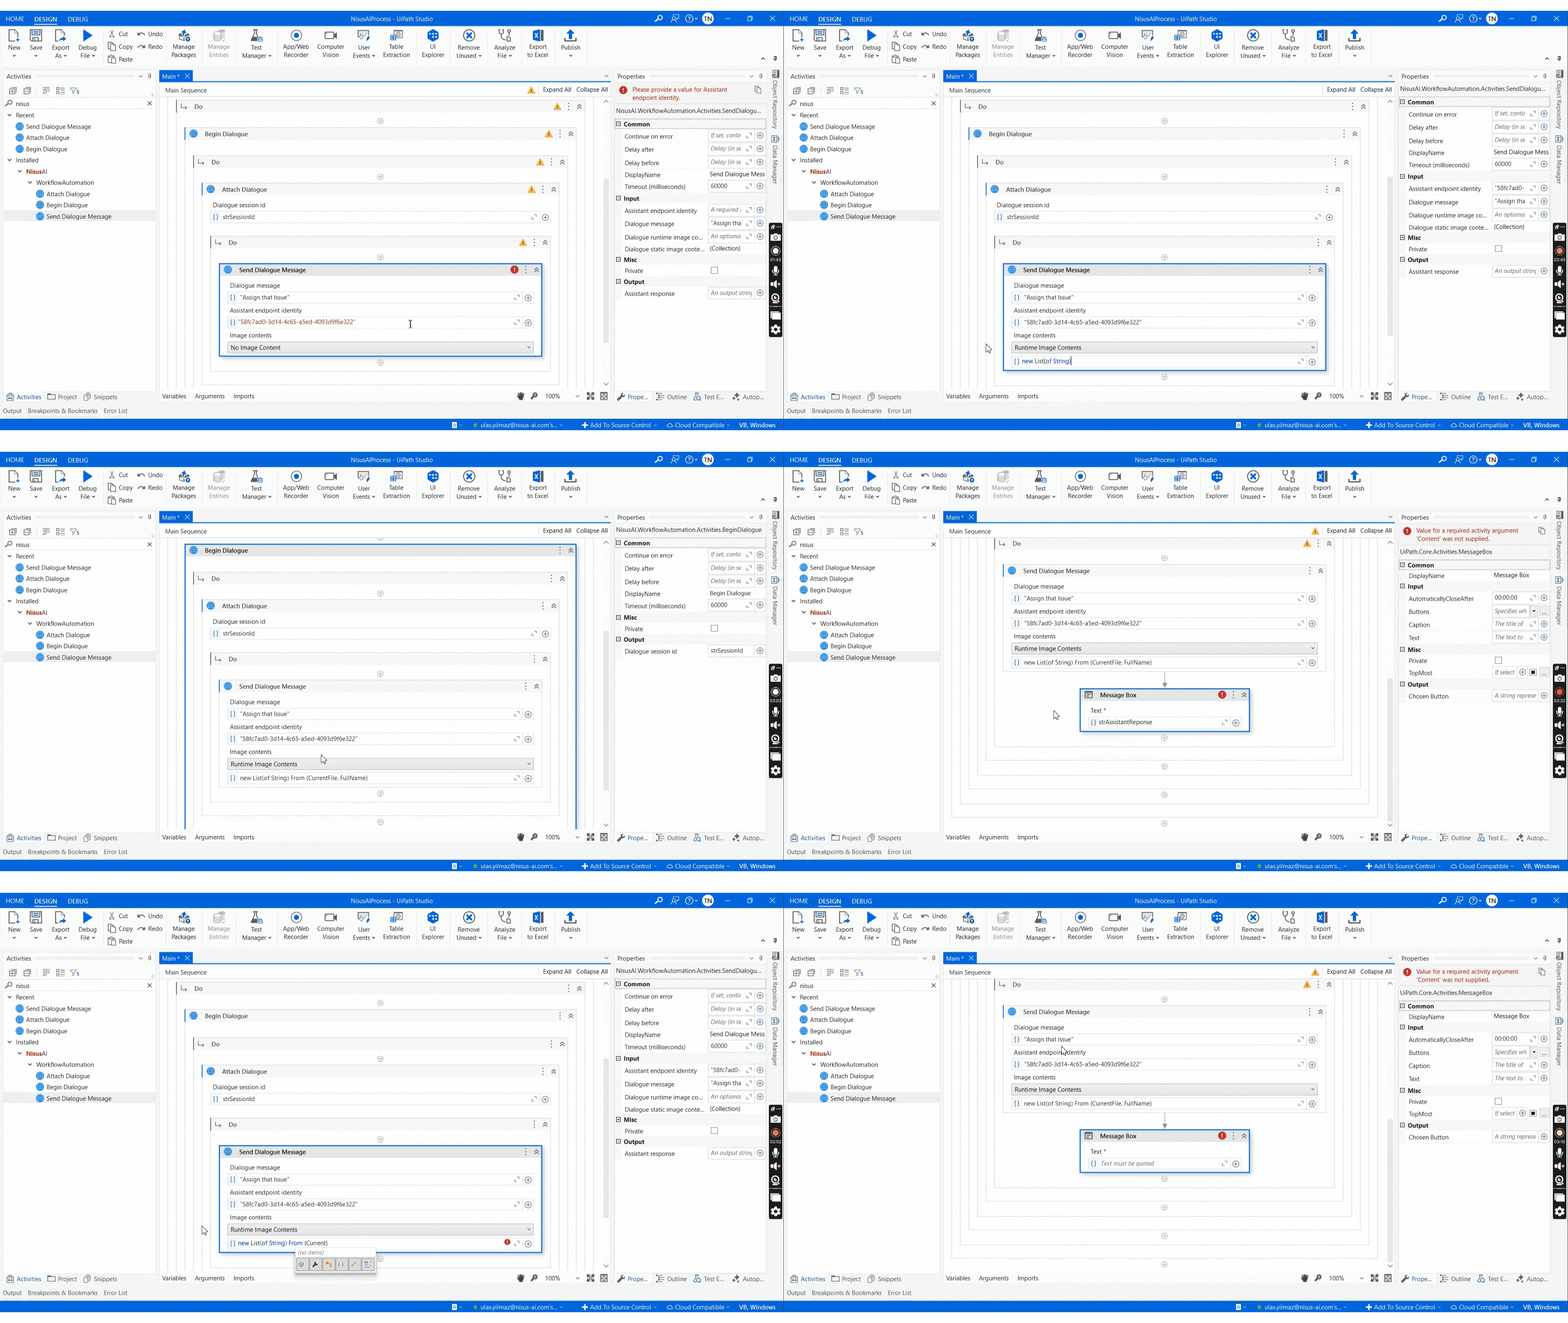
If sending a document or visual, add the file path in the 'Dynamic Image/Document Path' field. Example: 'C:\Users\User\Documents\invoice.pdf'. For multiple files, create a list or collection and add the paths accordingly.
Step 7: Congratulations, Workflow Completed!
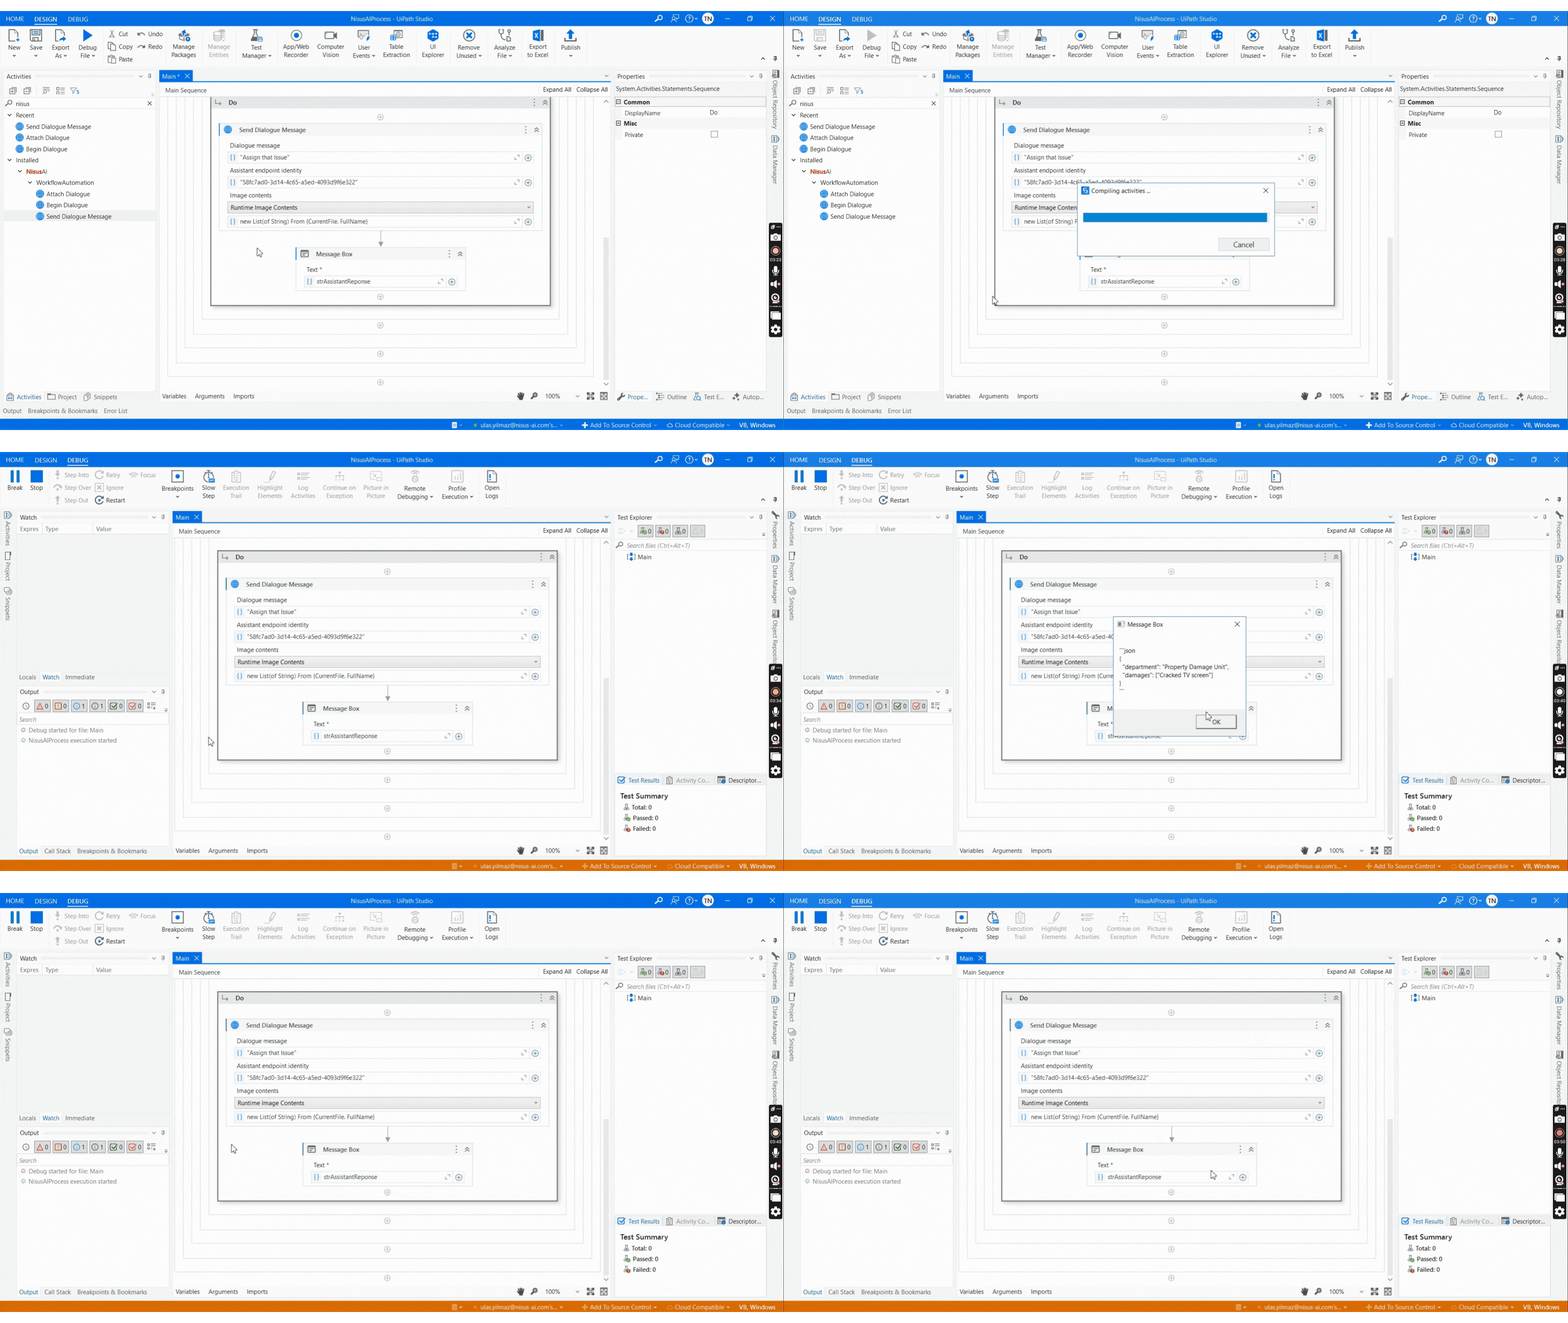
You can now process the assistant's responses. The AI assistant will respond to your messages and documents. Save these responses in a variable and use them in the next steps of your workflow. Congratulations, you're ready for Agentic AI!
Custom Activities for UiPath
Begin Dialogue
This activity starts a new dialogue session and returns a unique Session ID (GUID). This Session ID groups all messages you send under a single context, enabling the assistant to remember previous messages and provide more consistent and context-aware responses.

- OutputDialogueSessionId (string)
The unique GUID value of the created dialogue session.
Attach Dialogue
Attach Dialogue is a 'scope' activity that lets you connect to a previously initiated dialogue session (Session ID). All assistant calls within this scope are executed using the same Session ID, preserving the dialogue context, remembering previous messages, and offering more meaningful and consistent responses.

- InputDialogueSessionId (string)
The GUID value of the existing dialogue session to connect to.
Send Dialogue Message
The Send Dialogue Message activity sends a message to the specified assistant endpoint (Assistant Endpoint Identity) and retrieves a response. When used within the Attach Dialogue scope, messages are accumulated under the Session ID. This allows the assistant to remember previous messages. Additionally, runtime or static files (PDF, PNG, JPG) can be transmitted. The assistant can analyze these documents to provide richer, contextual, and meaningful responses.

- InputAssistantEndpointIdentity (string)
The assistant's endpoint identity (model endpoint ID).
- InputDialogueMessage (string)
The text message to be sent to the assistant.
- InputDialogueRuntimeImageContent (List<string>)
Paths of dynamically determined PDF/PNG/JPG files at runtime.
- InputDialogueStaticImageContent (Collection)
Predefined PDF/PNG/JPG files.
- OutputAssistantResponse (string)
The text response from the assistant.
